Outdoor Lighting Design: A Practical Guide to Beautiful, Safer Nights
Why Outdoor Lighting Design Matters
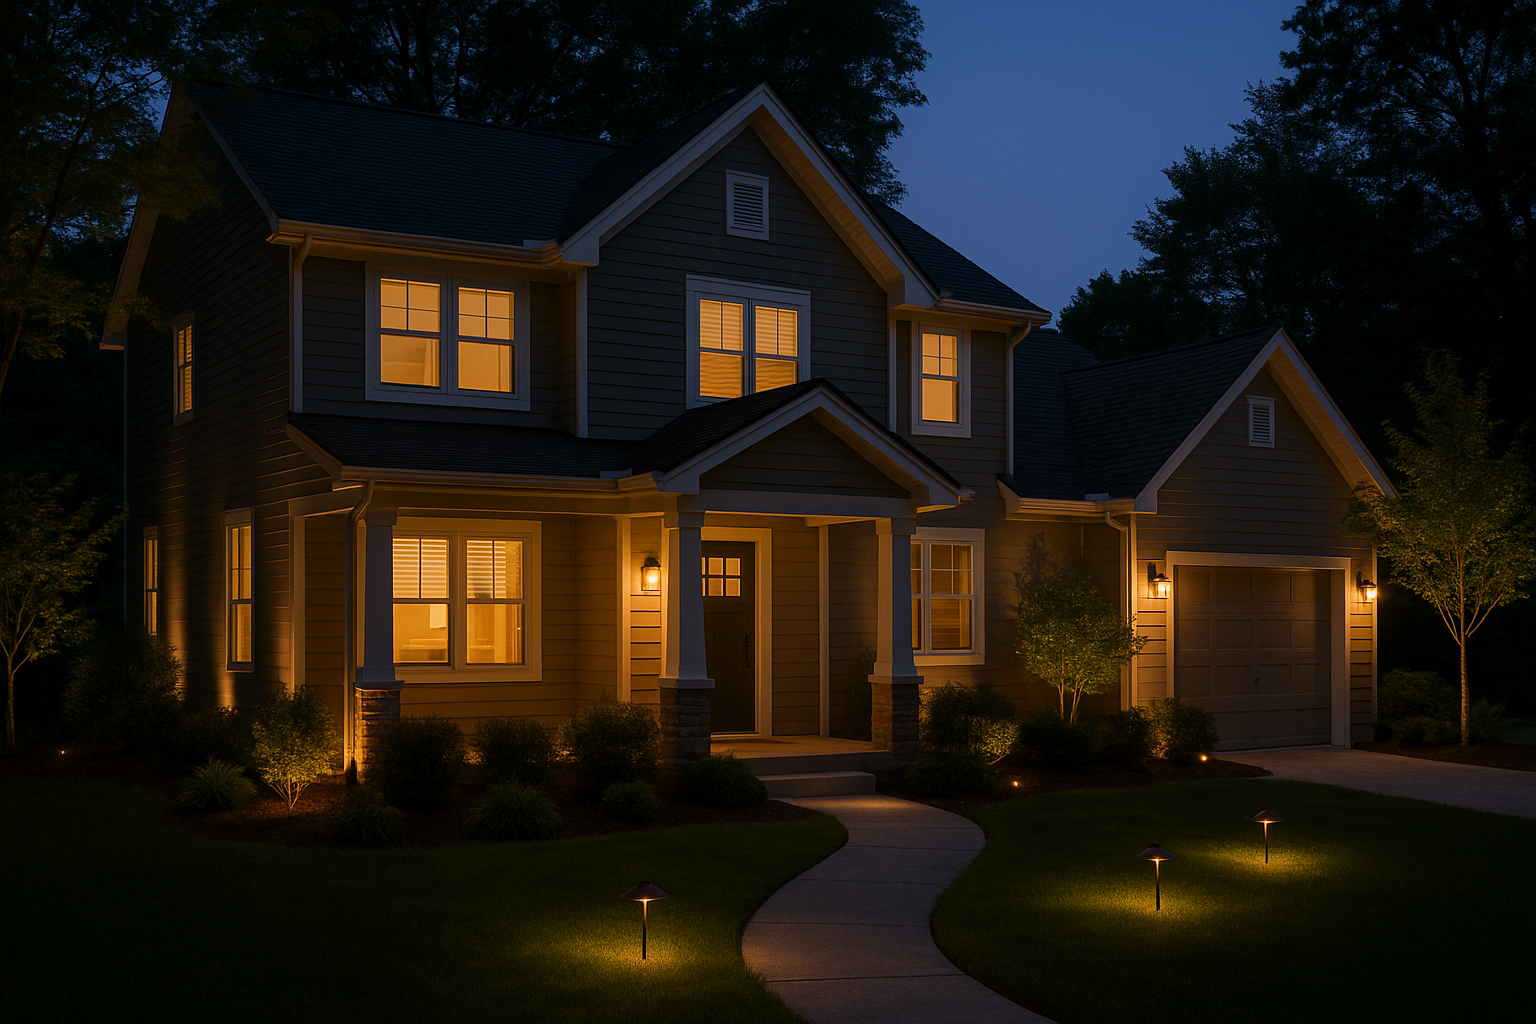
Great outdoor lighting design does more than help you see where you’re going. It shapes how your home feels after sunset—welcoming, calm, and intentionally styled. The right lighting can highlight your favorite landscaping, make paths safer, extend the hours you enjoy your patio, and even improve curb appeal.
Just as important, thoughtful lighting reduces harsh glare and dark corners. Instead of blasting the yard with a single bright fixture, a layered plan uses multiple light sources at lower levels for a balanced, comfortable result.
Key Principles of Outdoor Lighting Design
Layer your lighting: ambient, task, and accent
Professional-looking outdoor lighting usually comes down to layering:
- Ambient lighting provides overall visibility—think wall lanterns, soffit lights, or gentle area lighting near gathering spaces.
- Task lighting helps you do specific activities safely, such as grilling, climbing steps, unlocking the door, or walking along a path.
- Accent lighting adds drama and depth by highlighting trees, textures, architectural details, or garden features.
When these layers work together, your yard looks intentional rather than overlit or patchy.
Control glare and light spill
Glare is one of the most common outdoor lighting mistakes. It happens when bulbs are exposed or fixtures aim light straight into eyes or windows. Choose shielded fixtures, aim lights carefully, and avoid overly bright lamps. A good rule: if you can see the bulb from across the yard, it may need a different placement or fixture style.
Light spill matters too—especially near neighbors or bedrooms. Use focused beam angles and keep light aimed down and in, not outward and up.
Choose color temperature and brightness intentionally
Color temperature changes the mood instantly. Warm light (around 2700K–3000K) feels cozy and flattering for patios, entries, and most landscaping. Cooler temperatures can look stark outdoors and may make plants appear less natural.
Brightness should match the purpose. Subtle lighting often looks more upscale than “stadium” brightness. Dimmers and lower-lumen fixtures help you fine-tune the effect.
Planning Your Outdoor Lighting Layout
Start with goals: safety, security, and style
Before buying fixtures, decide what matters most in your space:
- Safety: paths, steps, changes in elevation, gates, pool edges.
- Security: entry points, dark side yards, garage approaches.
- Style: showcasing architecture, trees, garden beds, water features, and outdoor living areas.
Most homes need a mix of all three, but knowing your priorities helps you spend wisely.
Map the space and identify focal points
Walk your yard at dusk and note where it feels too dark or awkward. Then identify focal points you’d love to see at night—a sculptural tree, a stone wall, a pergola, or a favorite planting bed. Good outdoor lighting design uses darkness on purpose, so you don’t have to illuminate everything. Pick a few features to highlight and let the rest fall into soft shadow.
Use zones to create a natural flow
Think of your yard as a set of zones: front entry, driveway, side yard, patio, garden, paths. Each zone should have an appropriate lighting “recipe,” and transitions should feel smooth—no sudden jumps from very bright to very dark.
Best Types of Outdoor Lighting Fixtures (and Where to Use Them)
Path lights
Path lights guide movement and add polish. Place them to define the edge of a walkway rather than lining them up like runway lights. Staggering fixtures on alternating sides often looks more natural and avoids excessive brightness.
Spotlights and uplights
Use spotlights to draw attention to statement plants or architectural elements. Uplighting a tree canopy can be stunning, but aim carefully to avoid shining into windows. For a softer look, consider cross-lighting—two smaller fixtures from different angles—rather than one intense beam.
Downlights and moonlighting
Downlights mounted under eaves or high in trees mimic natural moonlight. This technique creates gentle pools of light and attractive shadows on the ground—one of the easiest ways to make a yard feel upscale and comfortable.
Step lights and hardscape lights
Steps and retaining walls are prime locations for low-profile lighting. Step lights improve safety without glare, while hardscape lights tucked under caps or ledges create a clean, modern glow along walls and seating areas.
Wall lights and entry lanterns
Front door and garage lighting should be bright enough for visibility, but not harsh. Choose fixtures scaled to the architecture and mount them at a height that lights faces and door hardware clearly. Matching finishes across the front elevation helps everything feel cohesive.
String lights and decorative fixtures
For patios and pergolas, string lights bring instant charm. Use them as ambient lighting and pair with targeted task lighting (like a grill light or downlights) so the space remains functional.
Smart Controls, Power Options, and Energy Efficiency
LED is the go-to choice
LED outdoor lighting is energy-efficient, long-lasting, and available in a range of warm color temperatures. It’s the easiest way to reduce electricity use while still getting excellent light quality.
Low-voltage vs. line-voltage
Low-voltage systems (typically 12V) are popular for landscape lighting because they’re flexible and often simpler to expand. Line-voltage lighting (120V) can be better for certain wall-mounted or high-output applications, but usually requires more involved installation. If you’re unsure, a lighting professional can help you choose what fits your layout and local code requirements.
Timers, photocells, and smart lighting
Automating your lighting makes it consistent and convenient. Photocells turn lights on at dusk, timers handle shutoff, and smart systems allow scenes (e.g., “Evening Entertaining” vs. “Late Night Security”). Dimmers are especially useful for dialing in ambiance on patios and near windows.
Common Outdoor Lighting Design Mistakes to Avoid
Overlighting the yard
Brighter isn’t better. Too much light flattens the landscape and creates glare. Aim for a layered plan with targeted highlights and comfortable ambient levels.
Ignoring beam angles and fixture placement
Two fixtures with the same brightness can look completely different depending on beam spread and aiming. Test placement before finalizing—small adjustments often make the biggest difference.
Mixing color temperatures
Using multiple color temperatures in one view can feel chaotic. Stick to a consistent warm range (often 2700K–3000K) unless there’s a specific design reason to vary.
Forgetting maintenance access
Even LED systems need occasional attention—cleaning lenses, trimming plants, adjusting aiming, or replacing a driver. Keep fixtures accessible and plan for landscaping growth over time.
Conclusion
Outdoor lighting design is part art, part practicality. When you layer light, control glare, and plan by zones, your home looks inviting and feels safer—without wasting energy or overwhelming the space. Start with a few key areas like the entry, paths, and a favorite focal point, then build from there as you refine your nighttime look.